EASY URAD DHAL MURUKKU - UZHUNDHU MURUKKU
 |
| EASY URAD DHAL MURUKKU - UZHUNDHU MURUKKU |
The recent lockdown due to COVID-19 has bought forth a lifestyle never experienced before. Sitting at home all day along with a wholesome work of just Eating & Sleeping. Maybe the womenfolks of every household found this period slightly taxing and overloaded due to their overtime cooking scenarios.
Panic buying Biscuits & Chips thinking that it could keep us satiated turned out to be monotonous snacking and gradually triggered our minds asking for variant Snacks, Savouries & Sweets. I had made few of this genre in these last few days, some new ones like this & few classic ones repetitively cooked at home. The list was longer than I imagined when I counted back on what I cooked in recent days. Savouries, Tea Time Snacks & Sweets left alone there were many other family favourite dishes which I frequented to satiate our relaxing minds.
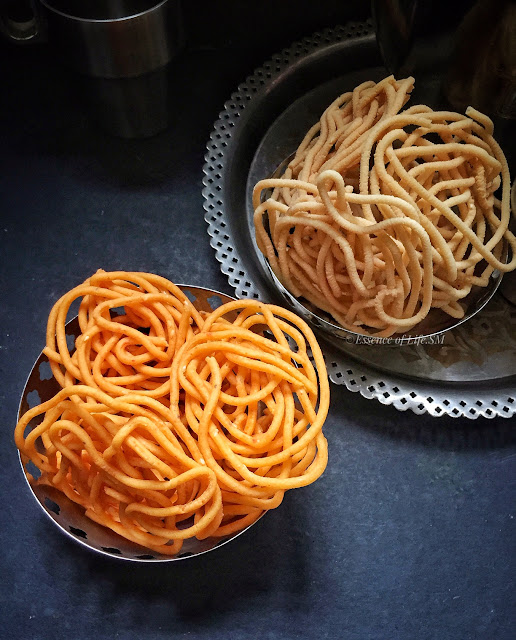
I was talking about this snacking mania to my MIL and she suggested me to make this Urad Dhal Murukku, an easy version prepared with cooked Urad Dhal and Idiyappam Flour. As I am from a School where tough recipes take a back seat, this easy Murukku recipe caught my attention and with precise measurements instructed by my MIL I made it the next day. I had never come across with this recipe before and for the first time, I should say I swept it out all perfect. It is one of the easiest recipes ever. This recipe makes for such tasty Murukkus and suits best for beginners. Simple ingredients and easier to cook. The best about this murukku is that the Urad Dhal(Uzhundhu) is pre-cooked and then kneaded along with Idiyappam Flour, Seasonings & Butter. I made two variants out of it, a plain batch and a spicy batch.
 |
| EASY URAD DHAL MURUKKU - UZHUNDHU MURUKKU |
My MIL suggested me to add 1 Cup of Urad Dhal for 4 Cups of Idiyappam Flour/Rice Flour. So I used cooked 1 Cup of Urad Dhal along with 3 Cups of Water for about 5-6 Whistles in a Pressure Cooker. Once cooked, mash the Dhal and then kneaded it along with Idiyappam Flour, Salt, Ajwain Seeds/Cumin Seeds & Sesame Seeds. Add just 11/2 Tspns of Butter. Adding too much butter can make the Murukku soft and it may tend to break when fried. Knead the dough and add water little at a time and form it into a smooth pliable dough. Make sure there are no cracks in the dough. I used a little less than 1 Cup of Water, as the cooked Urad Dhal also yields a bit of moistness while kneading the Murukku Dough. Some type of Rice Flour may need more Water, adjust accordingly. Rest it aside for about 20-30 Minutes and there you are ready with a wonderful Urad Dhal Murukku dough.
For more recipes on SNACKS & SAVOURIES, Click here...
Cuisine - Indian
Recipe Type - Snacks
Spice Level - Low-Medium
Difficulty - Medium
Yields - 45-50 Medium-sized Murukkus
Author - SM
Preparation Time - 25-30 Minutes
Cooking Time - 30 -45 Minutes
For more MURUKKU RECIPES, Click here...
HOW TO COOK MURUKKU WITH COOKED URAD DHAL /EASY UZHUNDHU MURUKKU
 |
| EASY URAD DHAL MURUKKU - UZHUNDHU MURUKKU |
INGREDIENTS:
To Cook Urad Dhal:
Black Gram Dhal/Urad Dhal - 1 CupWater - 3 Cups
For Urad Dhal Murukku:
Idiyappam Flour - 4 CupsAjwain Seeds - 1/4 Tspn
Sesame Seeds - 1 Tspn
Butter - 11/2 Tspn
Salt - To Taste
Boiling Water - 1 Cup(Approximately)
For Frying:
OilOptional Ingredients:
Dry Red Chillies - 6-7 Nos.Cumin Seeds - 1/4 Tspn
METHOD:
- Clean & Wash Urad Dhal 2-3 times or until water runs clear.
- Soak Urad Dhal ample of water for about 15- 20 minutes(Optional).
- Pressure Cook the dhal with 3 Cups of water for 2 whistles on a high flame and for another 3-4 whistles on a low flame.
- Switch off the flame and let the pressure in the cooker release naturally.
- Open the cooker and mash the Dhal with a potato masher or with the back of a ladle.
- Mash the Dhal when it is still hot & keep it aside.
- Add Idiyappam Flour/Rice Flour, Ajwain Seeds, Sesame Seeds, Butter and a dash of Salt.
- Mix everything well and add boiling water little by little & knead it into a smooth pliable dough.
- The Murukku dough should be smooth without any cracks.
- Separate the dough into small batches, roll it out and fill them into the Murukku press.
- Make a few swirls onto the reverse surface of a slotted spoon or directly press them into the oil.
- Drop the shaped Urad Dhal Murukkus gently into the oil and deep fry the Murukkus.
- Fry until it turns golden brown in colour and the sizzling sound stops.
- Once done, remove the urad Dhal Murukkus from the oil with a slotted spoon.
- Drain the Murukkus on a Paper Towel.
- Follow the suit for rest of the dough.
- Allow the Urad Dhal Murukku/Uzhundhu Murukku to cool.
- Store the Murukkus in airtight jars lined with Paper Towels.
For Spicy Urad Dhal Murukku:
 |
| EASY URAD DHAL MURUKKU - UZHUNDHU MURUKKU |
- Soak the Dry Red Chillies in Boiling Water for about 20-30 Minutes.
- Once soaked grind it along with a little bit of water into a fine paste.
- Sieve the ground Chilli Paste and add it along with other ingredients while kneading the Murukku Dough.
- Alternatively can add Red Chilli Powder while kneading the dough.
- Follow the suit as per the instruction for Plain Urad Dhal Murukku.
 |
| EASY URAD DHAL MURUKKU - UZHUNDHU MURUKKU |
NOTES:
- The dough should be in correct consistency. It should not be sticky or too hard.
- Do not substitute Butter with ghee or margarine.
- Butter should be at room temperature before mixing it into the flour.
- Butter is one main ingredient behind crispy and soft Urad Dhal Murukkus.
- Mash the Urad Dhal when it is still hot, otherwise, it may not get mashed well.
- Pour boiling water if you are using Idiyappam Flour to knead the dough.
- You can press the Urad Dhal Murukkus directly into the oil.
- Care should be taken while doing so.
- Allow the Murukkus to completely cool down before storing it in airtight containers.
- If stored properly it stays good for a week to 10 days.


0 comments